How To Fix A Crack In The Drywall That Keeps Coming Back
Home improvements seem endless, especially when you’re confronted with recurring problems like minor cracks in the drywall. They’re a pain in the eyes, but they’re usually easy to fix when you have the right materials and follow proper instructions.
Are you planning to do it yourself? That’s absolutely possible. Here is a quick DIY guide on how to fix a drywall crack that keeps coming back.
Phase 1: Gather Up Your Materials
Before you can start working on your “drywall crack repair project,” you need to gather your paraphernalia first. Look for the following tools that may already be available in your house. If not, you can buy these in the nearest hardware:
Wall paint
Putty knife
Patch primer
Drywall knife
Paint bowl or mud pan
Fiberglass mesh drywall tape
Sandpaper or Sanding sponge
After checking each one on the list, you’re ready to proceed to the next phase.
Phase 2: Follow The Instructions
First step. Material: Sandpaper or Sanding Sponge
The sandpaper or sanding sponge is used to smoothen the cracked area of the wall. Scratch the wall lightly to remove all the chipped paint that is hanging on the wall and clearing off the dust. Be sure to cover surfaces that you’re going to include in the repair.
Second step. Material: Fiberglass Mesh Drywall Tape
Cover the cracked line using a drywall tape, which in this case, a fiberglass mesh, is the most suitable and practical material to use. Make sure to precisely cover the center.
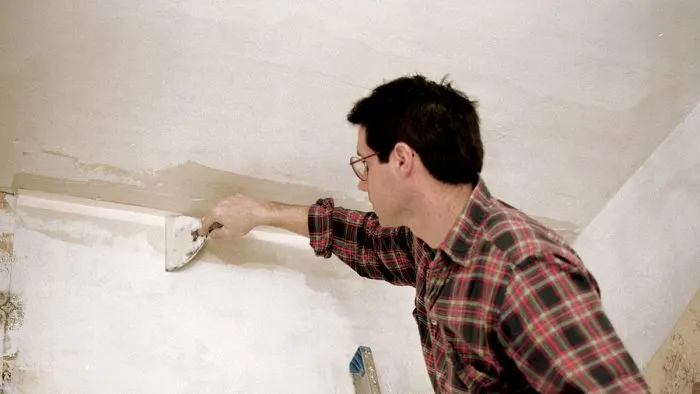
Third step. Material: Patch Primer
man fxing drywall
Apply an amount of patch primer that is enough to cover the crack and thinly over the fiberglass mesh. This material can help repair drywall cracks because it is not only a primer, but it also consists of a joint compound. With a pre-mixed product, you can save time and money for your project.
You would want to use a brand-new patch primer that is still securely sealed for excellent and long-lasting results.
Fourth step. Material: Putty Knife
Utilize the putty knife to spread the patch primer all over the broken area of the drywall. Try not to wrinkle the mesh tape when applying the patch primer, and double-check until you’re certain that you have completely applied the filling from the inside out.
Leave the patch primer to dry up for about 30 minutes.
Fifth step. Material: Patch Primer and Drywall Knife
Spread a second coating of the patch primer. This time, you should cover at least 2 inches wider toward all the outer directions of the crack: left, right, up, and down. Even out the application of the primer and smoothly flatten the final surface.
Leave the second coating of the patch primer to dry up for another 30 minutes.
Sixth step. Material: Sandpaper or Sanding Sponge
Use sandpaper or a Sanding sponge to polish the dried-up patch primer. This process will also help the proper blending of the product into the drywall.
Seventh Step. Material: Wall Paint
The seventh and final step is to repaint the affected area of the wall. A couple of coats can make your wall turn out looking like its original form.
To Conclude: How To Stop Drywall From Cracking
For Existing Cracks: You need to pre-fill all existing minimal cracks on the drywall. You can repeat all the instructions above, in all areas with drywall in your home. If you prevent these cracks from spreading while they’re still manageable, you may not need to perform a massive renovation.
For Ongoing House Construction or Renovation: If you’re still on the process of building or rebuilding the house, you can reinforce your walls with supporting joint compounds. For more reliable suggestions, ask your contractors for durable home improvement ideas.